Showing posts with label tutorial. Show all posts

Thursday, 28 August 2014

MINI-CELLO FOR A TEDDY (Part 3)

<a href="http://www.bloglovin.com/blog/12711763/?claim=u5t4xj8vphd">Follow my blog with Bloglovin</a>
Coming back to my mini-cello! I jointed the body with the neck and improved the shape of the neck.
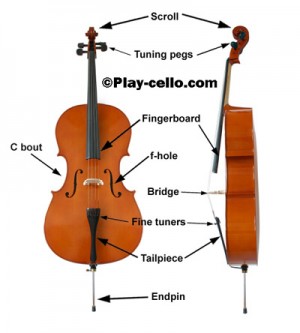
Before I continue telling my cello-making story let's examine how are different parts of the cello called:
So now we are cello-smart. I cut f-holes in the body and I also modelled tailpiece from paper clay. 
I painted the f-holes black. Then I cut a small "bridge" detail from carton. I also made some little holes in the body in which the bridge will be inserted later.


I covered my mini-cello with two layers of mordant. I chose the colour of larch.

Now it should be lacquered. I use special furniture lacquer. It has a strong smell, that's why you should better do it on the open air. This is my favourite work stage because after being lacquered the cello turns into a "real" one. Look at it!
Just minor details are left.  I hope to finish my little cute instrument tomorrow.  Follow the theme.

Have a nice day!  Don't forget that WE ARE THE MASTERS!

Saturday, 9 August 2014

MINI-CELLO FOR A TEDDY (Part 2)

<a href="http://www.bloglovin.com/blog/12711763/?claim=u5t4xj8vphd">Follow my blog with Bloglovin</a>
I continue working on my mini-cello.  Yesterday and today I added a certain amount of paperclay to the boards and made them a bit curved like the real cello's boards are. 

The important point of working with paper clay is that, if you want to get an elaborate shape, you shouldn't make it all at once: you'd better make a little volume of the needed shape, then let it dry and add more paperclay after drying. For the better result you may take up sculpturing your item as many times as you need in order to make the desired shape. Of course, it makes the whole process longer, but a good news is that you will model just for 30-60 min per day.  It will allow you to work on many other things at the same time. 


So I put the cello body aside and started making its neck.  I found good pictures of the real cello to get the clear view of the its neck shape.  First I made a wire frame. I tried to bent it in the right way:

Then I plastered it with a small amount of paperclay - not the whole amont for the needed shape - but just a little bit which is enough to cover the wire:
This is how it looks together with the cello body:
Now the neck is air drying.  I will work on it tomorrow.  Bye-bye!

Thursday, 7 August 2014

MINI-CELLO FOR A TEDDY (Part 1)

<a href="http://www.bloglovin.com/blog/12711763/?claim=u5t4xj8vphd">Follow my blog with Bloglovin</a>
Hi there!

I view my blogging as a daily (or almost daily:))) artist journal. I will be taking notes and pictures of everything I create day by day. Sometimes I work on different items during the day, so I will be making separate blog posts for various jobs and use multiple labels.


Today I start my MINI-CELLO PROJECT.  One of my Facebook friends asked me to make a tiny cello of approximeately 16 cm/6.3" high for her cute teddy.  This funny "teddy cello player" will be gifted to a serious human cello player on his birthday.

The task is very interesting and quite challenging because I have already made some toy cellos of paperclay and papier-mache, but never did them that small. Below are the pictures of my previous "cellos experience":


As for the mini-cello I was ordered I will be making it from paperclay. 
The reason why I picked this material is that the unique texture of paperclay being covered by mordant makes the clay look very much like real wood.  And this is exactly what I need because my cello will be a realistic item. 

First of all I calculated the dimensions of my cello and made a paper pattern.

Then I cut two rough cello silhoettes of thick carton.  They are a bit smaller than the pattern.

I put them together and wrapped by foil.


I covered that "foil-carton" cello with a layer of paperclay.  The shape is not ideal, of course. I should let the paperclay to air-dry a bit before I work out the correct cello shape. So now it looks rather rough.

That's it for today.  I will continue my "cello" project in my further posts.  For the cello making process I will be using the following labels:
  • tutorial
  • musical instruments
  • paperclay
Good Night!