Sunday 31 August 2014

THE DREAM OF VIOLA PLAYER: MAESTRO'S NEW HANDS

<a href="http://www.bloglovin.com/blog/12711763/?claim=u5t4xj8vphd">Follow my blog with Bloglovin</a>
Hello, my dear friends! Are you still here?  It makes me happy to have all your ears:))

Do you remember the severe critics lesson I was taught? How did I take it? I decided to improve my doll. As I told previously, two remarks on my "Viola Player" were absolutely fair: wrong hands and wrong hair. Everything is possible! I can redo both! 

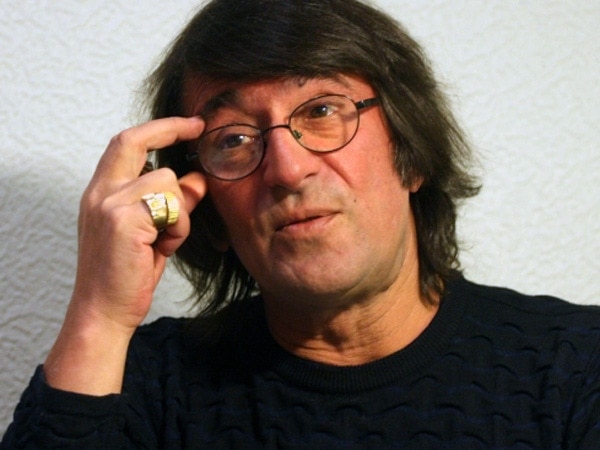
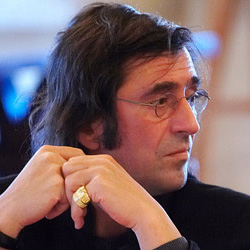
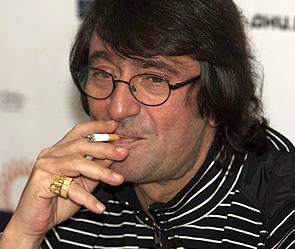
I started with hands. First I studied carefully a lot of Yury Bashmet's photos where his hands can be seen clearly. He has quite a big palm with long fingers of beautiful 
masculine shape. He always wears a massive golden ring on his right little finger. I selected several pictures, laid them before me, and started modelling the Maestro's arms.


I must admit that I never worked on the doll's hands so elaborately. The respected Miss N. told me that hands could be often more important than the face. While sculpturing I realised how right she was! Human hands are so unique and expressive that they have a lot of character in themselves. And when it comes to a portrait doll, THE HANDS MUST REFLECT PORTRAIT RESEMBLANCE AS WELL AS THE FACE.  

I worked hard two days and finally the new hands were ready. Unfortunately I was absolutely stupid because I didn't photograph them.  During the first year of my doll making I wasn't accustomed to take pictures of what I was doing.  I feel so sorry for it now!  The only piece of evidence I have at the present moment is a pair of Mr.Bashmet's "old hands".  Here they are!  Aren't they ugly? 
I keep them as a reminder to myself of the hands' crucial role in the doll's image.  Being ugly they still remain useful to me. 

I will hold on the "new Maestro's hair" story for the next time.  Good night, my dear friends! 

Don't forget how BEAUTIFUL AND IMPORTANT OUR HANDS ARE! 

Thursday 28 August 2014

MINI-CELLO FOR A TEDDY (Part 3)

<a href="http://www.bloglovin.com/blog/12711763/?claim=u5t4xj8vphd">Follow my blog with Bloglovin</a>
Coming back to my mini-cello! I jointed the body with the neck and improved the shape of the neck.
Before I continue telling my cello-making story let's examine how are different parts of the cello called:
So now we are cello-smart. I cut f-holes in the body and I also modelled tailpiece from paper clay. 
I painted the f-holes black. Then I cut a small "bridge" detail from carton. I also made some little holes in the body in which the bridge will be inserted later.


I covered my mini-cello with two layers of mordant. I chose the colour of larch.

Now it should be lacquered. I use special furniture lacquer. It has a strong smell, that's why you should better do it on the open air. This is my favourite work stage because after being lacquered the cello turns into a "real" one. Look at it!
Just minor details are left.  I hope to finish my little cute instrument tomorrow.  Follow the theme.

Have a nice day!  Don't forget that WE ARE THE MASTERS!

Monday 25 August 2014

THE DREAM OF VIOLA PLAYER - SUCCESS OR FAILURE?

<a href="http://www.bloglovin.com/blog/12711763/?claim=u5t4xj8vphd">Follow my blog with Bloglovin</a>
The portrait doll of Yuri Bashmet was ready and I showed it at the first dolls' exhibition I participated in October 2012. People liked it a lot, made pictures of it and complimented me. One of the popular newspapers "Moskovsky Komsomlets" covering the exhibition even published a photo of my doll in its on line issue. Needless to say that I was absolutely happy. 

A month later I participated in the other exhibition where my "Viola Player Bashmet Doll" took part in the competition "Dolls Master".  Again the doll attracted a lot of attention, was shot and praised. 


Bashmet Doll's photo appeared in the other media source "Rossyiskaya Gazeta".
At the last day of the exhibition I met my master, that lady who was teaching me to make a violin (see my previous posts). Do you remember that it was her advice to give my violin/viola a feminine look. Let's call this respected lady Miss N.  So I was very excited to see her.  Miss N. was one of jury of the contest and I was very eager to learn her opinion on my work.

I showed her my "Viola Player" doll and asked how she would have evaluated my first portrait doll experience. Of course I wanted some constructive criticism, but... what I heard was much beyond all my expectations...

Miss N. said that she could see no character in this doll, no image... Just a YELLOW-BROWN BLUR... 
I was totally destroyed. Apart of a "yellow-brown blur" concept I was also told some really valuable and fair comments.  The two principal of them were: WRONG HAIR and WRONG HANDS. The hair I stuck to my doll's head was of a wrong texture - too soft and dim. And the hands were made carelessly without proper working-out of details. That was absolutely true.

At that moment I was so frustrated by such severe criticism that I wasn't quite able to distinguish the fair remarks from a subjective negative view. And what is more important: having learnt the basic doll making technique I didn't get a very important skill yet - I DIDN'T LEARN TO PERCEIVE CRITICISM. 

This was a lesson to learn. How did I take it? Read my following post. 

Thank you very much for the attention to my creative torments. I wish you good luck and a nice day!

Wednesday 20 August 2014

VIOLIN OR VIOLA?

<a href="http://www.bloglovin.com/blog/12711763/?claim=u5t4xj8vphd">Follow my blog with Bloglovin</a>
So I need a very special charismatic personage who will be playing my "female" violin.  First of all I calculated the size of my future doll basing it on the violin's size. To my surprise the doll's height turned out too big. Since I didn't plan to make an oversized doll but I wanted to keep the realistic proportion I came to the following solution: it will be a viola instead of violin. Viola is 10 cm/4" longer than violin.  This difference was quite enough for me to make a smaller doll.
Now when I determined the instrument I started searching the desired prototype for my doll.  Actually it wasn't too difficult since the viola is quite a rare instrument. The image came to my mind instantly: YURY BASHMET. He is a very famous Russian viola player well known all over the world. And what is absolutely crucial for me - he has an extraordinary appearance: expressive features, dark eyes, aquiline nose and long black hair. He is the real character. Look at his pictures. Isn't he gorgeous?


I studied lots of Bashmet's photos and found the one which I like most.  He has a special cunning smile on it. 
I found this smile very appropriate to the unusual "female" viola he will he playing. I decided to portray him at leisure: my Bashmet-doll will be sitting on the chair at the rehearsal break and holding the viola in his arms casually. Like this:
No sooner said than done! I sculptured Yury Bashmet's smiling face rather quickly.  His facial features are so strikingly vivid that the portrait resemblance was quite easy to reproduce. It didn't take me long to sculpture this remarkable face.  And a month later the doll was ready.  I called it "THE DREAM OF A VIOLA PLAYER". 


At that moment I didn't have an idea how complicated and lucky would be the life of my first portrait doll.  

I will tell you more stories about it.  Please don't miss the DREAM TRAIN OF DOLLS blog.

Monday 18 August 2014

VIOLIN OR WOMAN?

<a href="http://www.bloglovin.com/blog/12711763/?claim=u5t4xj8vphd">Follow my blog with Bloglovin</a>
In my previous posts I told you how I came to a master class where we must have learnt to make a guitar.  Instead of it we were taught to create a VIOLIN.  
At the class I was the first one to finish modelling a violin from plasticine. I was smoothing its boards when the master said to me: "Look at that beautifully curved violin body! Doesn't it look like a feminine one? Why shouldn't you play with it and perhaps twist it a little bit to give it a human look."  At that moment I didn't quite realised that it was a pure provocation.  I found her suggestion rather tempting and... twisted the plasticine body as she told. The material seemed so soft and pliant in my fingers... I added some mass to the upper side of the front violin board and... I suddenly saw a feminine breast! I worked a bit on this part and it a few minutes it really turned into a teasingly shaped semi-spheres. 


I finished my mould at home.  It looked beautiful - refined female shapes could be easily read in the elegant violin body. When I brought it to the next class, the master praised my work.  I was only doubtful as to further use of such nontrivial instrument.  The master encouraged me to leave as it is: "It will look great if you just put it up on a decorative base.  No need to give it to a doll. It's an absolute "thing-in-itself", so called "per se". 

I was meditating on her words all the time as I was making my violin.  When the instrument was ready, I came to a strong belief that I WILL GIVE IT TO A DOLL. But the doll should be very special.  Someone who can play female violin brilliantly.  A genuine virtuoso!

Who will be this character?  Read my next post.

Friday 15 August 2014

HIPPIE SUSAN (Part 2)

<a href="http://www.bloglovin.com/blog/12711763/?claim=u5t4xj8vphd">Follow my blog with Bloglovin</a>

Hi folks! I dare to greet you so, since I am making a hippie!

Yesterday I told you how I decided to create a hippie doll.  Today you will learn how I made a guitar for her.


I modelled the doll's head, arms and legs from oven-baked clay, and right at that moment the invitation to the musical instruments masterclass came.  I took it for a good sign: you need a guitar and you have no idea how to make - and .. oops! - all of a sudden you are thrown a desired life-buoy.


I came to the masterclass and said that I need to make a guitar for my hippie doll.  The answer was rather unexpected: "Oh, never mind! We are making a violin here. Forget the guitar." I was confused and opened my mouth to object, by the master-lady had already started explaining the process and distributing the little violin paper patterns to the group. 

My bewildered look was too obvious and the master reassured me: "Don't worry!  For us, dolls makers, guitar and violin are almost identical.  But the point is that violin is more difficult to make.  If you learn how to make it now, you will do you guitar easily. You will see, I promise. Take a seat. Here are your violin patterns."

The next couple of hours I was too busy copying the patterns, modelling violin body from plasticine and sticking paper clay to my mould...  I found myself so deeply absorbed by the process that the perspective of making a "useless" violin didn't bother me.


In fact that "useless" violin turned out very very useful.  But this is a different story to be shared with you later.  As for the guitar, the master was absolutely right: I easily made it at home.


When I covered the guitar with lacquer and fixed the strings to its body, my Susan doll was also finished.  Thus my hippie got her musical instrument.

Now Susan and her guitar are inseparable friends.  The hippie girl is running her fingers over the strings and crooning her favourite song.


Look at them! Aren't they happy?

This picture I used while modelling Susan's face:


Thursday 14 August 2014

HIPPIE SUSAN (Part 1)

<a href="http://www.bloglovin.com/blog/12711763/?claim=u5t4xj8vphd">Follow my blog with Bloglovin</a>
It is by mere chance that musical instruments came into my dolls' world. Having made my first dolly guitar I couldn't stop doing string instruments. So, let's start from scratch.

One spring day a friend of mine invited me to participated in a masterclass on musical string instruments for dolls. The invitation came right in time because at that moment I was playing with an idea of making a hippie doll


Why hippie? I cannot explain it clearly why hippie image is so attractive for me, but in my imagination it has been absolutely irresistible since I was a child.  My early childhood dates back to the famous 70s and it was spent in Rome where my family happened to live.  You understand where I am driving at, don't you? Of course, that decade is notoriously known as the great era of hippies, beatniks, bohemians or drops-out. There is a vivid scene which I remember: lots of hippies are sitting and lounging at the Spanish Steps, long tangled hair, belt-bottom jeans, coloured tie-dyed blouses, head scarves... They were making some weird jewelry like nail bracelets which they laid carelessly on a shabby mat and sold them right there on the steps. 

The image of these bright floral-patterned idle people lazily running their fingers over guitar strings had a powerful impact on my childish mind.  While walking up the steps with my parents I examined these happy hipsters with eager curiosity trying to memorise every minor detail of their clothers, hair and make up, every single movement of the graceful untidy bodies, every sound of the hoarse melodious voices...  I kept saying: "I want to be a hippie when I grow up". Such statement made my father smile indulgently and my mom alarm seriously.  She took some clumsy attempts to prove how vain and futile "modus vivendi" of hippies is, but her words simply couldn't reach my ears. The view of colourful idlers was the way much convincing than any boring preaches.

As I grew up, the romantic flavour of hippie subculture faded but my memory preserved the external artistic beauty of the "flowers' children" look.  While making my first dolls and thinking over the image of a young contemporary woman I realised that the childish memory is very strong and it relentlessly pointed out to a hippie girl.

This is how I picked hippie image for my doll.  I named her Susan. Here you can see some pictures which inspired me in my work:


As you may notice hippie girls on the last two pictures are holding guitars.  Of course, my hippie Susan will be playing guitar.  I want the dolly instrument to look rather realistic. How can I make it? 

This is the topic for my next post.  My "hippie&guitar" saga is to be continued.  See you!